
A smooth and fast checkout process is essential for improving conversions and reducing cart abandonment in WooCommerce stores. One-page checkout offers a simplified alternative to traditional multi-step checkouts by consolidating the entire purchase process into a single, streamlined page. This approach helps eliminate unnecessary clicks and confusion, making it easier for customers to complete their transactions.
By reducing friction at the final stage of the buyer’s journey, one-page checkout enhances the user experience and encourages shoppers to complete their purchases without hesitation. This leads to higher satisfaction, fewer abandoned carts, and ultimately, better revenue performance for your store. As mobile shopping continues to rise, this efficiency becomes even more valuable for e-commerce success.
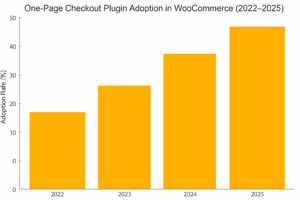
The bar graph shows the adoption trend of One-Page Checkout plugins in WooCommerce from 2022 to 2025. As seen, usage is projected to steadily grow year over year, reflecting its importance in boosting conversions and reducing cart abandonment through a simplified checkout process.
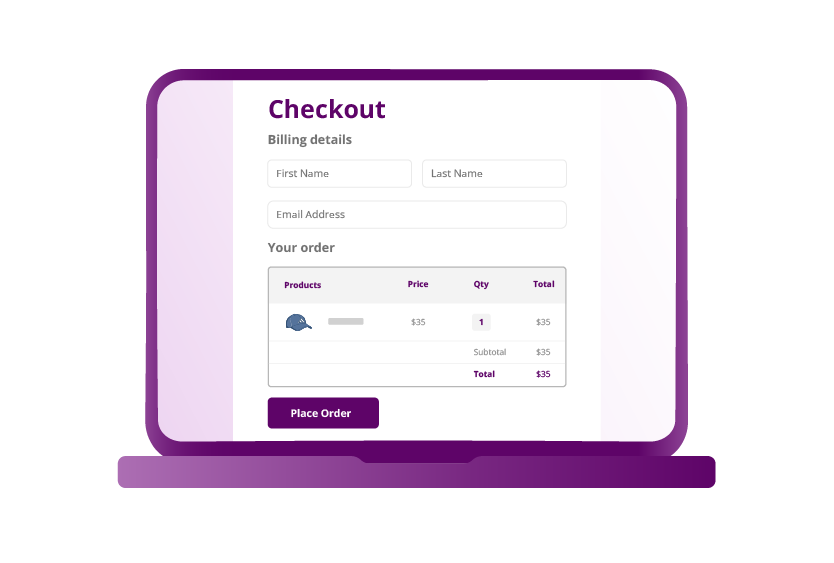
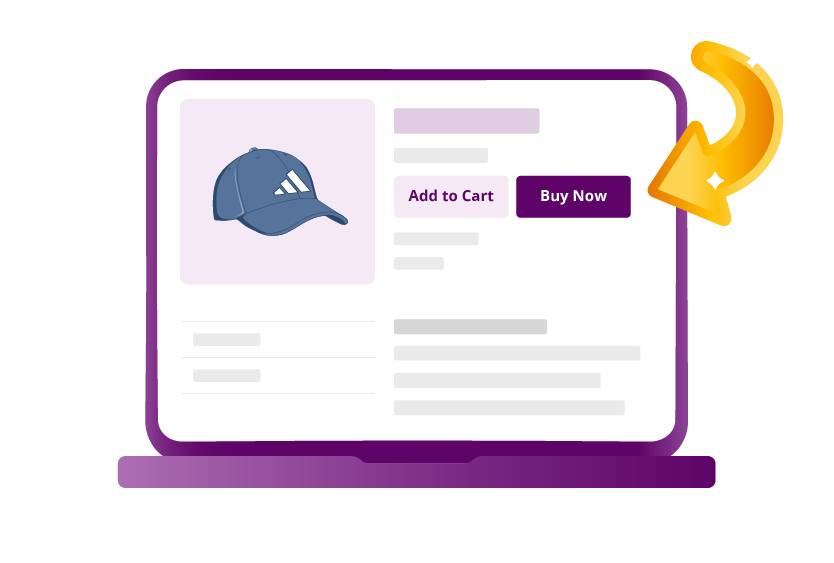
One-page checkout in WooCommerce is a streamlined solution that brings all the essential elements of the purchase process, product selection, cart review, and payment onto a single, unified page. Instead of navigating through multiple steps or pages, customers can complete their transaction from one convenient interface. This dramatically reduces the number of clicks, page loads, and time spent during checkout, making the entire process more efficient and less prone to cart abandonment.
This type of checkout is especially beneficial for mobile users or first-time customers who may be discouraged by lengthy or complex checkout forms. By displaying everything on a single page, store owners remove potential friction points, such as unexpected shipping steps or login requirements. The result is a smoother, more predictable path to purchase, which often translates to higher conversion rates and a better overall user experience.
Key components of one-page checkout include:
Implementing a one-page checkout in your WooCommerce store is one of the most effective ways to reduce friction in the purchasing process. Traditional multi-step checkouts often require customers to navigate through several pages to complete a purchase, which can be overwhelming, especially for mobile users or first-time buyers. Each additional step creates a new opportunity for abandonment. One-page checkout solves this by placing product selection, cart review, and payment entry on a single screen, allowing users to complete their orders faster and with less effort.
This streamlined experience is not only more convenient but also encourages more conversions by eliminating common pain points like slow-loading pages, form fatigue, and confusion. With everything displayed and easy to manage, users feel more in control of their purchase. It’s especially beneficial during promotional events or flash sales, where urgency and speed are critical. The result is a checkout process that’s optimized for performance and user satisfaction.
Key benefits of using one-page checkout include:
Selecting the right plugin is the foundation of successfully implementing a one-page checkout in your WooCommerce store. A good plugin not only allows you to merge all checkout steps onto a single page but also provides flexibility, customization, and compatibility with your existing store setup. Before making a decision, consider your store’s design requirements, the types of products you sell, and the checkout behavior of your customers. Look for features like drag-and-drop builders, pre-built templates, support for upsells, and compatibility with popular payment gateways.
Two of the most trusted and feature-rich plugins for this purpose are WooCommerce One Page Checkout and FunnelKit Checkout. These tools simplify the process of creating a one-page checkout and offer several advanced features to improve user experience and increase conversions.
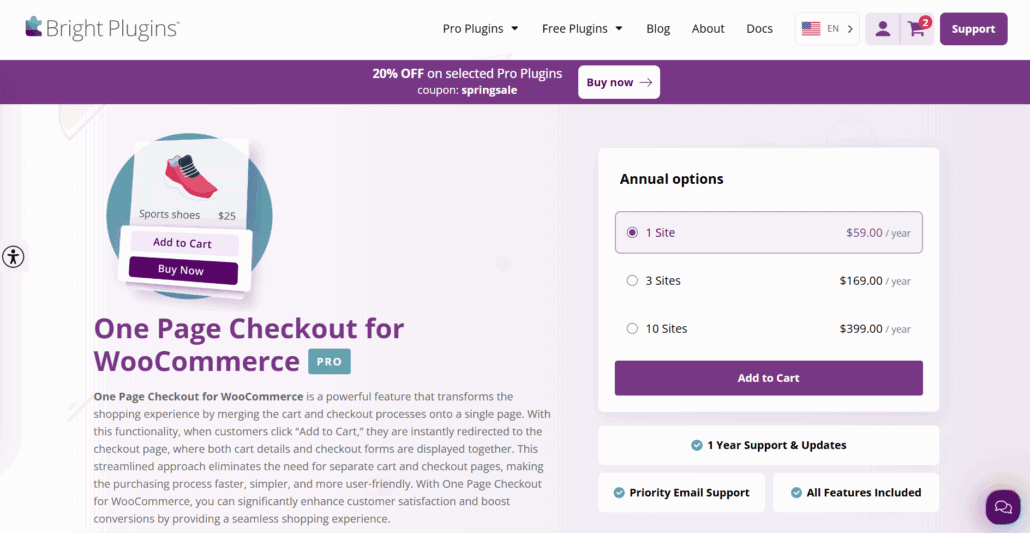
This plugin combines product selection and checkout into one seamless page. After adding a product, customers are instantly redirected to a checkout that displays cart and payment details together, minimizing clicks and streamlining purchases, ideal for boosting conversions and reducing cart abandonment.
Key Features:

FunnelKit Checkout is a powerful WooCommerce extension that replaces the default checkout with fully customizable, high-converting templates, both single-page and multi-step. It supports full design flexibility without coding, seamless integrations, and conversion-focused optimizations.
Key Features:
Once you've chosen the best one-page checkout plugin for your WooCommerce store, the next step is to install and activate it. This process is typically straightforward, even for users with limited technical experience. By properly installing the plugin, you ensure it integrates correctly with your site and functions as intended. Always make sure you're using the latest version of the plugin and that it is compatible with your current WooCommerce and WordPress installations.
Steps to install and activate the plugin:
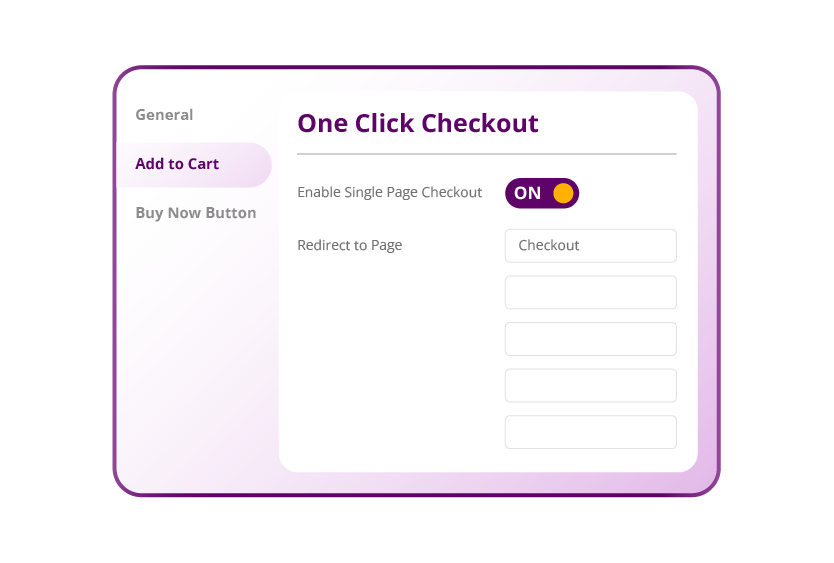
After installing and activating your chosen one-page checkout plugin, the next important step is to configure its settings to align with your store's needs. Each plugin typically provides a settings panel where you can control how the checkout page appears, functions, and interacts with other parts of your WooCommerce store. Taking time to fine-tune these settings ensures a cohesive and user-friendly experience for your customers.
Configuration options may vary depending on the plugin, but most will allow you to customize the layout, enable or disable specific form fields, and integrate with your store’s existing payment gateways. You’ll also have options for styling the page to match your brand, adjusting mobile responsiveness, and optimizing performance. Proper setup at this stage enhances usability and minimizes potential checkout friction.
Key settings to configure include:
Once your plugin is configured, the next step is to create a dedicated page where the one-page checkout will be displayed. This page serves as the core of your streamlined checkout experience, combining product selection, cart summary, and payment fields in a single view. Creating this page correctly ensures that customers experience a fast, intuitive, and frictionless journey from product interest to final purchase.
Whether you’re using WooCommerce One Page Checkout or FunnelKit, you’ll typically be given a shortcode or block to embed the checkout form. You can create a fully functional one-page checkout by placing this shortcode on any new or existing WordPress page. This flexibility allows you to design targeted landing pages for specific products, bundles, or seasonal offers—all while keeping the buying process simple and efficient.
Steps to create your checkout page:
Before making your one-page checkout live, it’s crucial to thoroughly test the entire process to ensure it functions smoothly across all devices and payment methods. A flawless checkout experience is essential for building trust and reducing the risk of cart abandonment. Even a small technical glitch or confusing layout can deter a customer from completing a purchase. That’s why testing should cover everything from form field validation to real-time cart updates and payment gateway responsiveness.
Conducting several test purchases allows you to identify any usability issues, design inconsistencies, or compatibility conflicts with your existing theme or plugins. Don’t just check it on desktop—ensure it works on various screen sizes and browsers. This step also helps verify that transaction data is properly recorded in your WooCommerce dashboard, emails are triggered correctly, and mobile shoppers have a frictionless path to payment.
Key areas to test:
Creating a one-page checkout is only the first step; optimizing it for performance, usability, and trust is what truly drives conversions. An effective one-page checkout should be clean, fast-loading, and focused only on essential elements. By minimizing distractions and making the purchasing process as smooth as possible, you reduce the likelihood of cart abandonment and improve the overall customer experience.
To enhance your one-page checkout, it’s important to follow a few proven best practices. These strategies help create a checkout page that not only looks good but also performs exceptionally well across devices and customer segments. From form field design to mobile compatibility and trust-building techniques, each detail plays a role in increasing your sales.
Best practices include:
Even after setting up an effective one-page checkout, there are several advanced strategies you can implement to further streamline the process and maximize sales. These enhancements focus on refining the customer experience, minimizing friction, and leveraging tools to recover lost revenue. From cart abandonment tools to upsell plugins, optimizing your WooCommerce checkout is an ongoing process that delivers compounding benefits.
Analyzing customer behavior and continuously improving checkout elements can lead to significant gains in conversion rates. Offering flexible shipping, monitoring performance, and personalizing offers during checkout can turn one-time buyers into loyal customers. Leveraging data and automation is key to creating a frictionless and persuasive checkout experience.
Further optimization strategies include:
If you're looking to enhance your WooCommerce store’s functionality even further, Bright Plugins offers powerful, user-friendly tools designed to help you grow. Whether you need advanced checkout options, quantity management, or custom pricing strategies, their premium plugins are built to improve the shopping experience and increase conversions.
Trusted by WooCommerce users around the world, Bright Plugins delivers solutions that are both easy to configure and packed with features. Their plugins are regularly updated and backed by responsive customer support, making them an excellent choice for store owners who want results.


